Pages

Monday, April 30, 2012

Nfu Oh #65 - Blue Holographic

Hey guys!

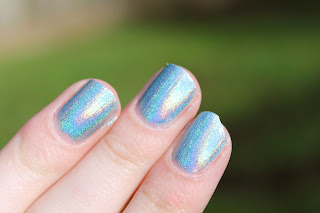
Today I used Nfu Oh's #65 which is a blue holographic.  I purchased this on fabuloustreet.com for $12.50.  I really love this color to death, even though it's the "dud" version (Nfu Oh changed their holo formula so now it's less holo :(  It's still very holographic (even in indoor light) so I am still extremely happy with this polish!
I used Nfu Oh's Aqua Base as a base coat, and that makes all the difference!  Invest!  The polish has no bald spots or dragging when you apply it over Aqua Base.


 This picture was taken under a bright desk lamp


 Sunlight - my camera didn't really capture the amazing holo-ness of this...there are a lot more rainbows :)


Indoor light - as you can see it's still very holo indoors (unlike some holographics that just turn flat).  I forgot to take a shade picture!!  

There it is!  I am obsessed with holographic nail polishes, so even though this is the "dud' I am perfectly satisfied :)

Thanks for reading!

Saturday, April 28, 2012

Essie Lights (swatches and review)

Hi guys!

Today I have a new Essie color from the Poppy Razzi Summer 2012 collection.  This collection includes four bright almost-neons.  I picked up mine at Rite Aid and they retail for about $8.  I used to steer clear of Essie since I'm not a fan of having to put on four or five coats to reach opaqueness, but since they've started coming out with some fun colors, I'm beginning to like the brand more :)

I got two of the four colors, Lights and Camera.  Lights is a bright pink that is super cute!  It's not a complete neon, but it's neon-enough to dry matte and extremely fast.  The formula on this polish was incredible!  I used two coats and it was completely opaque.  
 The bottle: I couldn't quite capture the true color of this (neons don't show up on pictures very well at all) but this is pretty close :)


 These were without a top coat, to show you that they don't dry completely matte, but they're almost matte.  The dry time on this was great; by the time I was done with my second hand, my first hand was dry!


 With a top coat: so shiny O.o

Natural light: this is definitely not color-accurate, but I tried!  

Thanks for reading!  :)

Thursday, April 26, 2012

Essie Turquoise and Caicos with China Glaze Luxe and Lush

Hey guys!!

So I have the second nail polish for you that I did on one of my friend's nails on Sunday :)  Allie wanted Essie's Turquoise and Caicos, so I was like, "That's a great choice!"  And then she spotted China Glaze Luxe and Lush (Hunger Games collection of course!) in my stash and asked if it could be used as a top coat.  I thought it was brilliant and I couldn't wait to see the end result :)
(As always, click on the pictures for bigger versions :)

 I really loved the way this turned out!  I used three coats of Turquoise and Caicos since it's on the sheer side, two coats of Luxe and Lush, and China Glaze No Chip top coat.  
Luxe and Lush was a bit hard to work with, it seemed like there was more clear base than flakies.  Two coats made it better though :)

 I'm in love!  In person, the flakies are even more prominent and it looks like she stuck shattered glass onto her nails; SO COOL!


I really enjoy this pairing of nail polish and I'll definitely be using it again soon.  I bought my Essie for around $7 at Target, and my Hunger Games China Glaze color I bought at Sally's Beauty Supply.  China Glaze retails for $7 - $8, but when I bought the Hunger Games collection at Sally's it was on sale for $3.50 each (with a Beauty Club card).  Amazing deal, right?

Thanks for reading! <3

Tuesday, April 24, 2012

Layla Mercury Twilight (holographic)

Hey guys!

So on Sunday the weather was extremely nice!  Two of my friends came over and so I painted their nails (of course!)  Erin picked Layla's Mercury Twilight.  I bought this on www.aveyou.com for $15.50 (10 ml).  This is one of my favorite nail polishes ever!  The linear holographic is one of the best I've seen, but (there's always a but) the wear is horrible.  Because top coats dull holographic nail polishes, I always go without.  It's a lose-lose situation: without a top coat the polish chips within 24 hours, but with the top coat you lose a lot of the holographic beauty.  It's still a gorgeous color!! :)

Be sure to use a holographic base coat (I used Nfu Oh's Aqua Base).  It makes all the difference!  Without it your polish will have bald spots galore.

 In sunlight.  This is one coat of Aqua Base, two coats of Mercury Twilight, and no top coat.  So gorgeous!

 The exposure on my camera was a little bright, but you can still see how linear the rainbows are.  The camera definitely dulls down the holographic effect; it's even more stunning in real life!

 Indoor lighting: still super holographic!  This is what I love about this polish: it's noticeable in every kind of light.

Blurry up-close shot to show off the linear-ness of it :)


That's it for today!  Thanks for reading, and if you get a chance definitely get a bottle of Mercury Twilight!  I know it's sort of expensive, but the results are definitely worth it :)


Sunday, April 22, 2012

Minnie Mouse Manicure

Hi guys!

Yesterday in celebration of the perfectly sunny weather (rare in the Northwest...) I pulled out my neon China Glaze Flip Flop Fantasy.  I sat there for a while trying to think of how I could make it more fun, and I thought of polka dots :)
For this manicure I used OPI's Base Coat, Sally Hansen Xtreme Wear nail polish in White Out, and China Glaze's Flip Flop Fantasy.

This is super easy and looks really cute!  Keep in mind neon colors dry matte, so you're gonna want a high-gloss top coat, like China Glaze No-Chip top coat.  Also, neons are extremely hard to catch on camera, so imagine these colors times 2,000!

This bugs me!  It's so much more neon.  In this picture it looks like a relaxed peach, and it is NOT even close to that hahahaa!

Step One: Paint your nails with a thin coat of any white.  This helps with the opacity of the neon color. Flip Flop Fantasy is more sheer, so this saves me painting on countless coats to get the goal color :)

Step 2: Paint one to two coats of Flip Flop Fantasy once the white has dried.  Neon colors dry very fast, so this step doesn't take too long.  I tried to make my picture under-exposed, and it worked (sorta) to show the neon-ness of the polish :)  But still, it's more of a candy pink highlighter color...

Step 3: Take a bobby pin, your white nail polish, and something you can drop some polish onto.  I used a macadamia nut lid, but virtually anything works

Step 4: Dip your bobby pin end into the white polish, and dot onto your neon color.  This is super easy, but don't forget to re-dip your bobby pin as needed :)


Add a top coat of your choice (but be sure the white dots are dry!!) and voila!  Finished :D  Now your nails look like Minnie Mouse!

I really love this manicure; I can't stop staring at my nails!  However, let me say for the 16,447 time that this is so neon in real life.  Enjoy trying this out with different colors!  
Thanks for reading <3

Friday, April 20, 2012

Nfu Oh Haul! #38, #39, #65, and Aqua Base

AHHHH!

My Nfu Oh order arrived today and I am beyond excited!  First, I want to talk about the customer service.  I ordered these polishes from fabuloustreet.com, and they were $12.50 each with free ground shipping in the U.S.  They had excellent service.  I had one question before I ordered, so I emailed them.  I got a response back within the day!  Then, when I ordered, I got my polishes in 3 business days.  Usually when I order nail polish, it takes a long time to get to me.  When I opened the box, the polishes were all wrapped up in a gigantic wad of bubblewrap.  I don't think they could've broken even if they wanted to :)

Now!  The pictures!  I haven't swatched these yet, since I had just finished my Smoke and Ashes manicure when the Nfu Oh's arrived.

I ordered #38, #39, #65, and Aqua Base.  I've heard that Nfu Oh recently changed their holo formula, and that their holo polishes weren't as holo-y anymore.  So, instead of spending a bunch of money and being disappointed, I only ordered one holographic.  It was so painful.  I'm drawn to holographics, and to leave all those beautiful linear holo's behind was horrific :(

All 4 bottles lined up.  Can I just say (like every other nail blogger ever :) how beautiful these bottles are?  They're shaped like a lady's corset and skirt!  How creative is that?

 This is #38.  It's an orange/green/yellow flakie that looks incredible over black.  I'm so excited to use this soon!

 The back of the corset <3


 #39.  This is a blue/green flakie that I can't wait to try over dark blue, black, and some purples :)


 I've read that Nfu Oh's Aqua Base is essential to apply their holographic polishes.  It was in stock, so I decided to try it.  I'll be doing a review on it once I've used it :)

 Ah, the long-anticipated #65.  This is a linear blue holo.  I've read all over blogs that Nfu Oh's new holo formula makes the polish look dull and non-holographic in the bottle, but if  you look at the next three pictures, that's clearly not the case.  Hm.  I'm hoping they went back to their old formula (just a wish/dream, I don't have any solid evidence :)


 Yes, that's a bruise on my thumb.  Sorry if I unintentionally grossed anyone out!

That's my first Nfu Oh haul!  I spent a countless amount of time researching the best holos and flakies before deciding to place an order with fabuloustreet.com.  Since I'm sort of a big spender, I've made myself a rule: I have to think about a purchase for at least 2 weeks before I buy it.  I've actually been really good by sticking to it!  So this wasn't an impulse purchase, I've been staring at gorgeous photos of these polishes for almost 3 weeks now :)

Thanks for reading!  <3

NOTD - China Glaze Smoke and Ashes

Hi everyone!

So today I finally got around to using China Glaze Smoke and Ashes.  I got it at the beginning of March when the Hunger Games collection first came out, but I hadn't used it yet.  I'm not a fan of black nail polish, but this nail polish converted me :) It's more of a super dark blue or green than black.  It has this amazing blue-green shimmer to it that makes it totally unique.  (Click on the pictures for bigger versions :)

My camera doesn't really do it justice, the blue and green shimmer is more pronounced, but you can see it's not just a plain black.


Again, you can't see the shimmer very well.  But this is just one coat.  One coat.  It was completely opaque, and I loved the feeling of just having one coat (that never happens :)


Then, for fun, I added a coat of Sinful Colors Pearl Harbor (on the right):


Pearl Harbor is a clear polish jam-packed with blueish-green shimmer.  This definitely brought out the subtler shimmer in Smoke and Ashes.


Well, that's it for today!  I hope you guys enjoyed :) I really love this polish, and I'm kicking myself for not using it sooner! :)

Wednesday, April 18, 2012

Spectraflair Top Coat with China Glaze Foie Gras

Hey everyone!

So recently I bought some highly-sought after Spectraflair (I got it from a user on Ebay - $20 for 1 gram), being the holographic lover that I am :) I added a tiny straw spoonful (I cut a drinking straw in a spoon shape) to a cheap Rimmel London base/top coat.  You have to shake it very well ;)

For my nails today, I did one layer of OPI's normal base coat.
Then, I painted on China Glaze's Foie Gras (part of their Hunger Games collection).  To get it completely opaque, I used a thin first coat, and a thicker second coat.
For the crowning glory, I used two (count 'em, two. I think I may need to add more Spectraflair to my top coat...) coats of my Spectraflair top coat.  This was the gorgeous result: (click on the photos for a larger view)


This was indoors, under a bright reading lamp.  You can definitely see the linear holographic beauty of it all :)

 This is in the bright sunlight (thank you Pacific Northwest for the sun today!!) You can definitely see the linear-ness :) However, I am embarrassed by those chips :P 


In the shade.  You can tell the holographic effect sorta goes away, which is sad.  I have some holo polishes (by Layla) that are BAM-in-your-face holo no matter what the lighting is.

One more for good measure :) ahhh! I'm dying over those two chips :P

Well that's it for now! Thanks for reading :) This was my maiden-voyage of nail polish blogging, so be expecting lots of more posts soon :)

I have a Nfu Oh polish order in the mail, so when that comes I'll definitely be doing reviews on #38, #39 (both flakies), #65 (another holographic), and their Aqua Base (base coat for their holo polishes)  Watch out for that soon!